“My DIY kit arrived last Saturday. I am fairly experienced at soldering, and building it was easy and took about an hour, And worked perfectly first time. As others had said, follow the instructions carefully and make sure all the LEDs are the right way round.
Time permitting, I hope to have some fun programming it, and look forwards to seeing what others have done.”
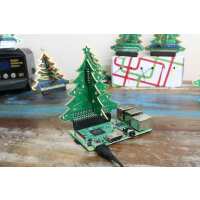
“A really cute add-on for the Pi Zero - I love it!
The trickiest bit of assembly is neatly removing the parts from the PCB frame - some fine cutters are probably the best tool for the job followed by careful smoothing of the cut surface. A gold Sharpie is just right for touching up the tree edges afterwards.
There have been a few questions asking if any GPIO pins are left over, and the answer has always been 'no'. That doesn't seem to be quite right as there are only 25 LEDs but 28 GPIO pins. Some inspection shows that GPIO 0, 1 & 3 are not used, but of course the physical pins are not easily accessible with the tree in place! The example code specifying the GPIO pins as -
LEDBoard(*range(2,28),pwm=True)
uses GPIO3 which isn't connected to the tree.
Either
LEDBoard(2, *range(4,28), pwm=True)
or the very pedestrian
LEDBoard(2,4,5,6,7,8,9,10,11,12,13,14,15,16,17,18,19,20,21,22,23,24,25,26,27, pwm=True)
will only use the GPIO pins which really are connected.
You can make the tree start flashing automatically at startup by adding the line
su pi -c "python /home/pi/tree.py"
before the 'exit 0' line in /etc/rc.local (using the appropriate path & filename for your script of course).”
“There was confusion as to delivery date as was Monday ( Not an actual date ) but delivered Saturday! Still not assembled and instructions should have included that the shorter lead was the side with the flat! Now it will have to sit in a drawer until I can get around to it!”
“The instructions for assembling the tree were very clear. The only problem was cutting the parts out of the frame. My cutters are too large to fit in the 'gap'. Ended up cutting the tabs with a diamond circular saw in a minature drill - worked a treat and allowed the rough parts to be ground flush.
Now looking to see how to make the light dispaly a bit more varied. Tried fade but there is a lot of flickering particually at the lower levels which rather spoilt the effect.
Has anyone else got any code for the lights they are willing to share ?”
“just got mine and soldered it together ready for Christmas.
some tips:
don't do what I did and skip ahead on the instructions and assume all the leds are the same way up, the 'ears' of the tree have the leds reversed, this is clearly visible in the instructions and on the board, but I thought I new better :D resoldered and all OK
Also, and this could perhaps be made clearer, it won't do much when initially plugged in, just a couple of LEDs illuminate. I thought I'd done something wrong until I typed up the 'flashy leds' script, so don't panic , it needs a script to enable all the LEDs :)”
“Arrived yesterday and with a bit of convincing my boy to get soldering me and my son dived into the garage and put it together!
Instructions were fantastic, guided through the process easily (for both him and me) and we quickly had it up and running.
It's now in the living room, twinkling away, giving him ideas about how we can use it to create interesting animations.”
“Works great and was easy to set up! Hardest bit for me was breaking it out of the shell! Would be cool if we could run a script or install something with apt-get that activates this code and injects it to startup for the Pi. Only thing I might change is the top red LED to white!”
“bought pre-soldered version due to shaky hands. took five minutes from unpacking to having the example code running. twinkling away, very festive, especially in a darker/dark room. looking for alternates now like changes from random to fixed pattern as a notification device. or responds to music.”