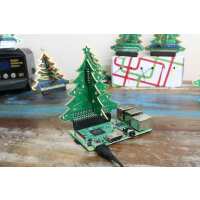
“What a great little thing! Fantastic to spend an hour soldering. Could do with a wiring diagram and perhaps some explanation, for the beginner.
Anyway, I'm trying to get my head around why all 40 pins are being used, but only 24 LEDs. I must be having a bad hair day... My attempts to trace the PCB have failed.. Why are the 5v pins being used? The sample code seems to iterate over ground pins; how is LED on working on ground pins? Can anyone just explain how 1 of these LEDs is working, including wiring, and I can extrapolate the rest? Many thanks.”
“In enjoyed spending some time soldering and building this project. Once I had it working, I decided to use it with Sonic Pi, using SP to send OSC messages to a python server program which was then used to control the Christmas Tree lights. You can see a video of the result here
https://youtu.be/ChHajjxiLvM
The music syncs better that shown in the video. I utilised the demo program (speeded up a bit) in the software section, and also modified the code produced by user "DJ" in this list of reviews. (Thanks).
I have more details on the system at https://in-thread.sonic-pi.net/t/sonic-pi-controls-the-pihut-christmas-tree/491 and you can get the code at https://gist.github.com/rbnpi/5f5e9356e627d1cbc52086efbb56456c”
“I created a GIT collection of examples from people comments here. (full credits added off course) https://github.com/ppumkin/thepihut3dxmastree-examples - If you want to add more please fork and pull request back into the branch maybe we can get a nice collection going for next years buyers. I have bought more of these as stocking fillers!!”
“I ordered three of the pre-soldered kits, but none of them came with any directions. The physical assembly was not very difficult, but getting them to work was another story. I am not a programmer, so I ran into some issues there. I created a file named xmastree.py and pasted the provided code into it. I then saved it and made it executable. However, it would not run. After a lot of Google searches, I still couldn't get it to work. It is odd that all the Python sites never mentioned running code files by either preceding the file with the 'python' command or making line 1 of the code file: #!/bin/python. After doing the later, the code runs just fine. Another hint to the non-programmers out there, some of the sample code listed in the reviews requires indents that don't appear in the sample.
I also have a feature request for next year's rev 2 of the kit. Please replace the LEDs with multi-color LEDs.
Merry Christmas All!
Jon”
“I ordered 2 trees, soldering version. For some reason, in one of the kits, 3 LEDs did not work. Polarity was correct, voltage on the pins, but no light. On one of them I noticed, that one of the pins broke out of the red plastic body. Maybe they've been demaged during shipment, the envelope was beaten up a little. I replaced them with green ones I found in my basement, now all of them are working.
Thanks to DJ for testing out the numbers, I used parts of your code. Now the trees are blinking and shining in all kinds of patterns, one on my desk at work, one at home.”
“Loving the Xmas tree, even if the documentation is a bit lacking.
After figuring out the LED pin mapping, I've managed to create a Python program to use the tree as an advent calendar:
https://github.com/taylor-made/pihut-xmastree-advent”
“This was my first build project and I added a header to my pi zero to poke out of the bottom of the case. However when the LEDs wouldn't behave I realised that the build picture shows the header on the component side of the pi zero boards. Now waiting for a 40 pin male to female ribbon to correct my mistake.
If you've read this far you have been warned.”