“Cracking case. Much better airflow than my previous one. Average Pi temp has gone from about 60 degrees down to between 30-40 degrees depending on what the node is doing.
Is a bit fiddly but nothing unreasonable. I'm using the PoE hat on some of my Pis and it can handle them fine with a little bit of extra thought to placement of screws.
It is a bit on the louder side so not something I would want to have in the same room as me. It is pretty compact though so lives in a cupboard.”
“Very nice case to make a Pi blade farm. A couple of negative points though:
1. It is expensive - the price of another Pi!
2. The screws holding the fans in place are slightly too long (about 3 - 4 mm) if you mount a 2.5" SSD on the plate and so the plate wont mount fully. It works if you put the SSD plate in the slot that is in the middle of the fan but not if you put the SSD plate on the right side (when looking from the front). To get it to fit, the right hand screws need to be loosen or taken out (not ideal). Putting the Pi to right side of the fan and the SSD in the slot to the left of it (i.e in the slot that is in the middle of the fan) works but is sub optimal as only the top of the Pi is cooled rather than both sides (when it is in the slot in the middle of the fan) and the PI to its right is not turned on. OK not a deal breaker but still it would have been much better if the screws were 3-4 mm shorter or, better still, if the nut was recessed into the fan and captured by it. The SSD mounting holes could be shifted towards the front of the panel by 2 mm and the screws shortened by 2mm.
Other than that, its a solid unit that makes my Pi cluster / blade farm look very neat and professional.”
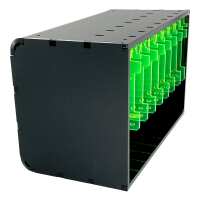
“Attaching the fans and mounting the Pi(s) on the mounting plates was straight forward, and the plates clip in very easily. Two slots at the back of the case need to be aligned with tabs at the end of the plate, the other end of the plate (open end) is then gently raised to locate a third tab into a slot on the top of the case, finally the clipping tab on the flexible lever arm slots in. The only minor challenges were making sure the internal fan cables connecting to the GPIO power pins weren't in the way, and the last plate insertion was a bit harder due to limited working space due to the 7 other Pi(s) being in place (make sur you have good light). It also helps if you have fairly flexible USB-C power connectors (I am not using the HDMI connections so can't comment on those).
Finally, also make sure you have put in the MicroSD card you plan to use, and assuming you are using SSH that that has been enabled. The reason for this is that card slot is at the back of the case and so you need to remove a plate in order to insert/change the MicroSD.”
“I would recommend this case for larger Bramble Cluster projects. First install the fans. Then each Pi is mounted on the acrylic mounting plate with 4 screws and 8 spinning nuts, this part is straight forward. The mounting plates, with the Pi attached, then simply clip in: first feeding the 2 tabs at the end of the plate into slots at the back of the case and then raising the other end of the plate to first locate a third tab at the top of the plate before finally connecting in the flexible clip at the top nearer to the front of the case. Prior to this the fans need mounting, Note before clipping in the plates, you will need to connect in the power to each Pi and also the fan power ( to 4 of the Pi's GPIO headers). The hardest parts were navigating the process of clipping in the plates when the fan cables were in the way, and also the last plate was harder as at tgat point there was no side access due to the other Pis. But overall i'd say it was straight forward.”