“Good product, easy to build. Note I can't get the extra digits to work provided by Steve, attempting to use them causes an error in line 252 in led.py :-(”
“No problems building - doesn't quite fit into the official pi case, but it's close.
modified led.py to add a few more digits....
'f': 0x47,
'g': 0x5e,
'h': 0x37,
'i': 0x30,
'j': 0x38,
'l': 0x0e,
'n': 0x15,
'o': 0x1d,
'p': 0x67,
'q': 0x7b,
'r': 0x05,
's': 0x5b,
't': 0x0f,
'u': 0x1c,
'y': 0x3b”
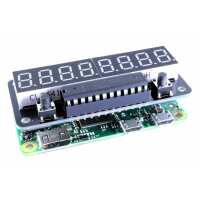
“I have just received this and got the board working with my Raspberry Pi.
There is a mistake with the buidl guide though, on page 20, step 7 you need to install “python-pip” as well. Otherwise you cannot run the command on step 11, page 21 ( You get unknown command “pip”.”
“Absolutely top!
All worked first time.
The build guide is the best I have seen (bar the minor python-pip thing already noted).
A couple more suggestions:
Instead of blue tack, try a piece of foam. Place the components through the holes. Put the foam on top, then turn it over and solder them. The foam holds the components in place and close to the board. and its less messy than blu-tack.
Secondly, to bend the pins on the chip inwards people should hold the ends of the chip, then with one row of pins resting on the desk, bend all the pins in the row at once. Repeat for the other side. If people try to do this with pliers or by hand they will make a right mess and probably fail to insert the chip.”