“The ability to wirelessly control Arduino or Raspberry Pi projects is extremely useful and the idea of a gamepad-style controller integrated with what is effectively an Arduino Leonardo MCU and XBee adapter is great in principle. XBee / ZigBee technology carries a relatively steep learning curve but offers significant advantages over alternatives like Bluetooth or Wi-Fi in terms of range, speed, reliability and flexibility.
This product has a lot of potential but at a cost of around £60 in the UK - plus the cost of the XBee module which is not included - there is a reasonable expectation of quality and support which the product falls short on in certain areas.
Pros:
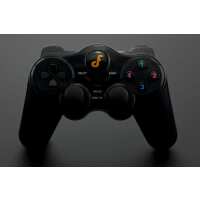
1. Well-designed gamepad-style controller offering 18 control parameters, including two analogue joysticks with 10-bit resolution, 2 analogue buttons and 14 digital buttons. A further button – confusingly marked ‘Analog’ on my model, provides an external Reset button for the MCU.
2. In-built Arduino Leonardo clone is programmable via the standard Arduino IDE and includes two Serial ports – one (Serial) for the USB monitor and a second dedicated UART port (Serial1) for the XBee module.
3. The latest version 2.0 Programmable via a standard USB connection using the supplied micro-USB adapter. Does not require a separate FTDI adapter like its predecessor.
4. Runs off 3 standard AA batteries which are easily accessible.
Cons:
1. Perhaps the worst aspect is the lack of adequate documentation and sample code. What documentation there is on the DFRobot wiki page is inconsistent (e.g. the control mappings vary or are incomplete), and the only code sample provided is a very simple sketch which outputs text strings via the onboard USB Serial monitor. There is absolutely no documentation on how to configure a basic wireless (“802.15.4”) XBee connection in either “AT” or “API” modes, and finding suitable documentation and code samples in the public domain is no easy feat for the beginner.
2. The casing itself feels reasonably robust but the internal build quality leaves something to be desired. On my model, the wires connecting the MCU to the battery pack were extremely flimsy and poorly soldered – one end had actually broken loose. I ended up having to solder longer, heavier gauge wires to the battery pack.
3. The two halves of the case are held together with 7 very small self-tapping screws. It is very easy to cross-thread the plastic screw holes. Ensure that your transmitting XBee module is correctly configured (e.g. via Digi’s XCTU software) before installing in into the gamepad and screwing down the casing, otherwise you’ll find yourself fiddling with several small screws and some flimsy wiring each time you need to access the module.
4. The MCU is programmed via a 6-pin PCB header which requires an external micro-USB adapter (supplied), which you lose or break at your peril. For the price I feel it should have been possible to provide a direct micro-USB port in the case itself.
5. The XBee socket is effectively hard-wired to the UART ports on the MCU. It is therefore not possible to configure the XBee module while it is installed in the gamepad (other than via Remote AT wireless commands, which requires a fairly high level of XBee expertise). It would be useful to have the facility to reverse the internal TX/RX connections in such a way as to allow you to configure the XBee whilst in situ – many XBee breakout boards provide such a facility.
6. The analogue joysticks used appear to be similar to the simple thumb joysticks found in many Arduino starter kits. These are fine for experimentation and prototyping, but they are unlikely to survive extensive use. In addition, the joystick potentiometers have a significant dead spot in the first 10 or 15 degrees of travel from the centre position, though this is quickly compensated for by touch.”
“The ability to wirelessly control Arduino or Raspberry Pi projects is extremely useful and the idea of a gamepad-style controller integrated with what is effectively an Arduino Leonardo MCU and XBee adapter is great in principle. XBee / ZigBee technology carries a relatively steep learning curve but offers significant advantages over alternatives like Bluetooth or Wi-Fi in terms of range, speed, reliability and flexibility.
This product has a lot of potential but at a cost of around £63 in the UK - plus the cost of the XBee module which is not included - there is a reasonable expectation of quality and support which the product falls short on in certain areas.
Pros:
1. Well-designed gamepad-style controller offering 18 control parameters, including two analogue joysticks with 10-bit resolution, 2 analogue buttons and 14 digital buttons. A further button – confusingly marked ‘Analog’ on my model, provides an external Reset button for the MCU.
2. In-built Arduino Leonardo clone is programmable via the standard Arduino IDE and includes two Serial ports – one (Serial) for the USB monitor and a second dedicated UART port (Serial1) for the XBee module.
3. The latest version 2.0 Programmable via a standard USB connection using the supplied micro-USB adapter. Does not require a separate FTDI adapter like its predecessor.
4. Runs off 3 standard AA batteries which are easily accessible.
Cons:
1. Perhaps the worst aspect is the lack of adequate documentation and sample code. What documentation there is on the DFRobot wiki page is inconsistent (e.g. the control mappings vary or are incomplete), and the only code sample provided is a very simple sketch which outputs text strings via the onboard USB Serial monitor. There is absolutely no documentation on how to configure a basic wireless (“802.15.4”) XBee connection in either “AT” or “API” modes, and finding suitable documentation and code samples in the public domain is no easy feat for the beginner.
If anyone’s interested, I have endeavoured to create an easy-to-use Arduino library for this gamepad based on XBee’s running in standard 802.15.4 API-2 mode.
https://github.com/WeatherwaxCosplay/Gamepad_XBee
2. The casing itself feels reasonably robust but the internal build quality leaves something to be desired. On my model, the wires connecting the MCU to the battery pack were extremely flimsy and poorly soldered – one end had actually broken loose. I ended up having to solder longer, heavier gauge wires to the battery pack.
3. The two halves of the case are held together with 7 very small self-tapping screws. It is very easy to cross-thread the plastic screw holes. Ensure that your transmitting XBee module is correctly configured (e.g. via Digi’s XCTU software) before installing in into the gamepad and screwing down the casing, otherwise you’ll find yourself fiddling with several small screws and some flimsy wiring each time you need to access the module.
4. The MCU is programmed via a 6-pin PCB header which requires an external micro-USB adapter (supplied), which you lose or break at your peril. For the price I feel it should have been possible to provide a direct micro-USB port in the case itself.
5. The XBee socket is effectively hard-wired to the UART ports on the MCU. It is therefore not possible to configure the XBee module while it is installed in the gamepad (other than via Remote AT wireless commands, which requires a fairly high level of XBee expertise). It would be useful to have the facility to reverse the internal TX/RX connections in such a way as to allow you to configure the XBee whilst in situ – many XBee breakout boards provide such a facility.
6. The analogue joysticks used appear to be similar to the simple thumb joysticks found in many Arduino starter kits. These are fine for experimentation and prototyping, but they are unlikely to survive extensive use. In addition, the joystick potentiometers have a significant dead spot in the first 10 or 15 degrees of travel from the centre position, though this is quickly compensated for by touch.”