“Really well made little LED backpack for the Pico, fits really snuggly on the Pico and seems easy to code although I haven’t spent a lot of time with it yet. Fast delivery, thanks!”
“Recently I bought a 'Pico scroll pack' to use it with a Raspberry Pi Pico that I had mounted on a 'PICO DECKER'. Adding the Pico scroll pack onto the Pico decker board was easy. One just must pay attention to the 'usb sign' on the back of the Pico scroll pack. The usb icon must be 'lined up' with the side where is the USB connector on the Raspberry Pi Pico board. See the image I attached. The preparation of the software side is a little less easy than installing the scroll pack on the decker board. Following the instructions, I flashed a custom firmware (.uf2 file) to the Pico. I also cloned into a Raspberry Pi 4 (the 'host' PC for the experiments) a Git set of source programs and example scripts for MicroPython and C/C++.
To run a MicroPython sample script I use the 'Thonny IDE', installed on the Raspberry Pi 4. Before starting the demo script I had to check/set two important settings inside the IDE: 1) choose 'MicroPython (Raspberry Pi Pico) as the Python interpreter; 2) select the serial port via which the Raspberry Pi 4 will communicate with the Raspberry Pi Pico, in my case: "Boards in FS mode - Board CDC (/dev/ttyACM0)". When these were set, the Pico 'reported' itself immediately inside the 'Shell' window of the IDE as: 'MicroPython e7cde34 on 2021-02-11; Raspberry Pi Pico with RP2040'. The sample program loaded into the IDE worked straight away, without any flaws.
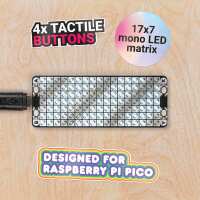
I like the 'Pico scroll' board very. It is built well. The brightness of each of the 17 x 7 pixels can be set.
Because this is my first scrolling device, I had to get used to the 'technique' available to control the individual pixels. I discovered that 'switching off or on a pixel' is done simply by writing to the pixel a brightness value in the range 0 to 255. With this new experience I am now on my way to develop a scrolling text (marquee) script. I just took me some hours of experimenting to fully understand how to program this nice scroll device. Thanks to the good documentation the company provided on their webpages and on Github.
Beside writing nifty scripts to make nice effects on this scroll device, it also contains four buttons, marked like some of the buttons on an X-Box game controller: A, B, X and Y. These buttons can be used for games or to control other functions like starting or stopping certain processes. I think this Pico scroll pack is good value for money. I cannot compare it with similar products because this is the first scroll pack I ever owned. Since 1977 I experiment with hard- and software. A lot of gadgets and kits passed my hands. This Pico scroll pack I liked from the start. The whole idea around the Raspberry Pi Pico is to attract young people into experimenting with hard- and software. To start learning programming to control devices, Internet of Things and so on. The Pico Scroll pack fits excellent into this effort. Even not being a young person; not a beginner; nevertheless, I'm eager to learn new things. Programming and experimenting with hardware never bore me. I already have various ideas what to do with this Pico scroll pack. I am happy to answer questions, listen to suggestions. Look for @paulsk in Discord. I wish you happy hacking!”