“Very disappointing. Firstly, one of the "layers" (number 3) arrived broken. This layer has one thin bit that was snapped away from the rest of the plastic (held together only by the protective peel-off film). That same layer was also cut incorrectly and, despite trying to for quite a long time it simply wasn't going to fit over the square J14 connectors.
Very fiddly and, in the end, totally unusable. Has put me off buying from Pimoroni again.”
“Based on the video how to assemble, it can be easily done in minutes. Also it covers the unused parts perfectly without covering the pin layout or the place for the fan to cool the processor”
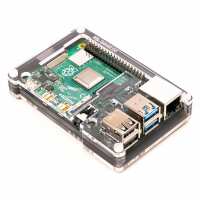
“Really useful and good looking case for the RPi4 that has a good solid feel to it. The various connectors around the edges of the Pi's board are not obstructed and the ports are labelled on the top plate of the stack. Unlike some other RPi cases that I have the Pibow does not obstruct the SIM slot so that SIMs can be switched without having to remove the Pi from the case. The case also also gives unobstructed access to the four corner mounting holes on the Pi board. It's not something that I am using but I can see that it could be useful to anyone wanting to incorporate a Pi within another device.
The solid nature of the stack gives the user extra confidence when pushing connectors in, or pulling them out, because you have a solid structure to grip the Pi by. One advantage of the Ninja version of the case is that the LED telltales on the board can be seen through the side as well as from the top.
Assembly is a little fiddly but not too bad. If, like me, you find the third layer doesn't slot in smoothly then check that you are not putting it on upside down. It is important to get the two middle layers on the right way around to create the cutout that accommodates the power and HDMI plugs. Three useful tips to help in assembly:
1. When fitting the nuts rotate them anti-clockwise until you hear a click/feel them drop into place on the screw thread. You can then start gently turning them clockwise to start tightening them up. This technique will minimise the danger of cross threading the nut on the screw.
2. First get all four nuts and screws loosely fitted, then tighten them in diagonal pairs. This helps to avoid putting too much stress on any one part and lets things slip into place correctly.
3. Do not over tighten the nuts. It is possibly safer to use a screwdriver rather than a spinner when tightening up the screws, provided the width of the blade fills the full width of the slot in the screw.”
“Easy to follow instructions on the website and it keeps the raspberry pi snug and secure and looking awesome on my desk. The dark colours really look classy.”