“I've often used a hammer as a screw driver. This is the first time I've used a hammer instead of a soldering iron!
I'd been wary of the Pi Zero and its HATs not fancying all the precise soldering that would be required.
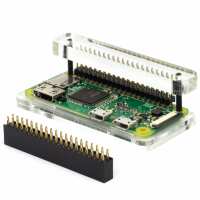
The GPIO Hammer Header has enabled me to build the Pimoroni Pirate Radio kit without touching a soldering iron...!
I'll be back for more Pi Zero's, HATs and hammer headers...”
“As I am a big noob in soldering, I bought this. This is a great idea it take less than 1 minute and it works perfectly.
Really thank you for this great idea Pimoroni !”
“These headers are possibly my favorite product, installation takes minutes and prevents the need for soldering the 40 pins individually. I can solder fairly well but when I discovered this I had to try it. Goodbye inadvertent solder bridges and the mild but ever present worry that you might heat the board too much. Hello minor worry that you might break something by hitting it with a hammer (spoiler: you wont) I highly advise the jig, its a couple of pieces of plastic that hold the header and board very well and make installation a breeze. Soldering is a great skill but for the small cost of a few of these you can have your boards talking in moments.”
“I bought the GPIO Hammer Head (Male) a few weeks ago, as I wanted to see what the fuss was about. Don't get me wrong, soldering is a good skill to have when using the Raspberry Pi, but it does grow tedious, quickly. Installation without the jig is tricky (just like the Pirate Monkey Ninja Robot guys say in their description) so the next time I needed to install the hammer headers, I bought the installation jig which is much, much easier!
It took me less than 2 minutes to assemble the jig and fit both the male header (to my Pi Zero) and the female header to my new Scroll pHAT HD. Soldering would have taken me a lot longer.
If you are thinking of buying the headers without the jig, I wouldn't recommend it because one slip can damage your Pi.”
“It is good to have one at home, if you have a Raspberry Pi Zero, because the need for a GPIO header can come suddenly. It is so quick and easy to assemble the header that it can be done when you need it to be done, not much planning involved. Only a word of caution, to carefully keep the header aligned during assembly, because the first time I used one of these, it was leaning a bit to one side, since the plastic piece that you apply the hammer to is not by itself keeping the header straight. It was easy to remedy so it is not a problem if you are checking the angle of the header during the process. The electrical connection is reliable.”