Login
Start Free Trial Are you a business? Click Here

Radiator Fan Kit High Pressure MX5 Mk1 Reviews

3 Rating 2 Reviews
Read MX5parts Reviews

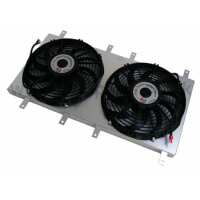
IL Motorsport High Pressure Fan SystemConsisting of two "Spal" cooling fans prefitted to an ultra lightweight aluminium plate, this amazing quality kit is the perfect addition for any performance enhanced Mk1, giving unparalled cooling performance. Spal are world renound as one of the market leaders in cooling fan production, so you can be assured of only the very best quality. Each fan gives an incredible 1630 m³/h blow power, double that of the original Mazda one, and with this kit you get two of them! Suitable for use with all original, aftermarket and performance aluminium radiators, the kit is supplied pre assembled, with full fitting instructions. Also, if you combine this with one of our performance aluminium radiators, you can be assured of having one of the coolest cars around!Fits all 1.6 & 1.8 Mk1 models, 1989>1998 

Visit Product Page

Phone:

02392 644588

Email:

sales@mx5parts.co.uk

Location:

1 Orion Court, 5 Rodney Road,,,
1 Orion Court, 5 Rodney Road,,
Portsmouth
PO4 8SZ

António Sousa
Verified Reviewer
Does a good job in cooling, but it was a bit of a pain to install.1) The mounting holes DO NOT line up with the stock Mazda radiator, and the tabs do not move enough to compensate for this. I had to extend 3 of the holes for it to mount properly.2) The connectors on the two fans are of different types.Note: The fan shroud depth is extended in order to seal up to the stock (retracted) Mazda radiator. If using an aftermarket radiator, you may have to cut away some depth from the shroud.
Helpful Report
Posted 7 years ago
Simon Buckley
Verified Reviewer
I got this with the ILMotorsports alum. radiator to cool off the turbo conversion.....at the first attempt the fan casing arrived in a flimsy box, and bent. Thanks, MX5parts, for an easy exchange and refund; the second one arrives a lot better packed and unbent. From the start it is obvious that the fan casing and the radiator have never met before, despite the fact that they are advertised as belonging to each other. You need 10mm spacers and longer bolts (not supplied) to get them to join convincingly, and the brackets on the fan casing need to be coaxed with a set of mole grips to get all the eight holes to line up at the same time. At this point I lose faith in German engineering skill, but press on, making allowances. The assembled rad. and fan casing slide in more or less easily, and I fill it up, get the bubbles out and push the female connectors on the first fan into the old fan's connector and leave the second fan for later. A fifteen mile spin shows everything working, the temp gauge (already converted to a proper progressive readout) even shows when the thermostat opens to release the colder coolant into the system. I am happy. The fan blows like anything sitting in the traffic, and I come home intent upon wiring the second fan through a time delay relay to come in a minute behind the first fan to reinforce its efforts on a hot day. Thinking that the wiring to the first fan really needs to be a bit more shockproof than a couple of crimp connectors pushed into the old block I realise that there is very little space to get at the short tail of cable hardwired into the fan to alter it , and then I make the fatal mistake of thinking that the fan itself, fixed with four accessible bolts, could be taken off to work more easily on that short, ridiculously short, tail of wire. Experimentally I loosen the first bolt. It is not into a captive nut. S**t. The entire thing has to be drained and taken out again because our fine German colleagues have fastened the fan to the casing with loose nuts, one of which is half undone and can't now be tightened again without complete disassembly form the radiator, and doing this is impossible without pulling the radiator out of the car. So....(Germans, pay attention now) 1. make the b****y thing so that it fits together properly. 2. make the tails of cable long enough to be worked on after the thing is installed (how much would that cost), and 3. do not assemble anything that may be taken apart without captive nuts. It will work eventually, and very well, I expect, but the hassle is unnecessary.
Helpful Report
Posted 7 years ago