Login
Start Free Trial Are you a business? Click Here

Chrome High Level Brake Light Cover MX5 Mk3/3.5/3.75 Reviews

4.5 Rating 30 Reviews
Read MX5parts Reviews

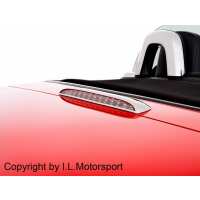
This cover sits like a second skin on your brake light, even the stripe under the glass is chromed. Double layer 3M tape is installed on the inside of the brake light cover and fitting only takes minutes.Fits all Mk3, Mk3.5 & 3.75 models, 2005>2015Please note: The covers for the Retractable Hard Top and Soft Top Cars are different so please select the correct type for your car from the drop down box below.  

Visit Product Page

Phone:

02392 644588

Email:

sales@mx5parts.co.uk

Location:

1 Orion Court, 5 Rodney Road,,
Portsmouth
PO4 8SZ

Phillip Stewart
Verified Reviewer
I fitted this cover along with the chrome fog lamp bezels, wing mirror trims and ariel base trim to my Dolphin blue Kendo, looks amazing as it compliments the chrome trim that was already fitted with it being the ltd edition and enhances further the styling of the car, all of the chrome items are very simple to fit but as others have reviewed I made sure I cleaned thoroughly each section and then offered up the trim to each piece to guarantee I had got it correctly placed before fitting all of the items of excellent quality and delivery was very quick I recommend any of these chrome trim to give your MX the look it should have had straight from the showroom
Helpful Report
Posted 9 years ago
David Greenwood
Verified Reviewer
Again excellant quality part and can't fault MX5parts service. This is my 3rd item from them in 2 weeks and again it arrived next day. Fitting the cover needs a little attention to placing in correct position but I found it quite easy, just take your time at lining it up. I found peeling a couple of centimetres off the bottom bar tape away - in preparation for easy detachment after I fitted the top. I would reccommend doing this to get the back section flush with body of the car. Once again I give it 5 out of 5.
Helpful Report
Posted 9 years ago
Nicholas Carter
Verified Reviewer
Read other reviews with a degree of trepidation but found installation quite easy. Did a couple of dry runs to check exact location and where pressure should be applied. Pushed the front steel strip into location under light, holding the top strip above the car paintwork. Then gently pushed the top strip back and down over the 'bump' pressing down to make good contact. Worked fine for me and looks great. Great service from mx5parts
Helpful Report
Posted 9 years ago
Looks great as previous reviewers have said, but note cover is not a complete fit over the brake light.It leaves a section uncovered, only a small one mind, but nevertheless it need to be made slightly larger to be perfect.
Helpful Report
Posted 10 years ago
Great quality looks FAB on my Roadstar MX5 .Fast delivery packed perfectly would not buy from any other dealers this is my 3rd Mazda- Simply the Best -I give ***** five stars......
Helpful Report
Posted 11 years ago
Lewis Thomson
Verified Reviewer
I didn't use the glue provided. I did a few dry runs before fitting, always hinging it forward from the back (nearest the screen) and pushing down. I then used a strip of insulating tape to act as a hinge on the back of the cover nearest the screen which meant I could line it up perfectly. Once confident with the technique I removed the double sided tape on all but the skinny bit below the lens, but peeled back some of the skinny bit tape for later. Once pressed into place I could then remove the skinny bit tape whilst bending the skinny bit into place. Then removed the insulating tape hinge. It is definitely a one chance affair but as always preparation is the key to success. Good luck!
Helpful Report
Posted 11 years ago
Difficult one this - 5 stars for how it looks on my Dolphin Grey Kendo - 1 star for fixing instructions and the high possibility of getting it stuck in the wrong place!Many dry runs are required so that you understand what is about to happen.The Chrome cover is not a snug fit, the ends are 'lifted' by around 3mm which doesn't look good.The gap narrows to about 1.5mm upon correct fitting - but 3M tape needs to be inside the ends to stick down better.Supplied is an alcohol wipe, the Chrome cover and a tube of primer. Great care is needed fitting this, as I said - take as many dry runs as you think you need to feel confident.1. Wipe the cover on the car with the alcohol wipe.2. Smear the cover with the Primer and allow to dry, about 5 minutes in the sun.3. Peel back 20mm from each end of3M tape from the thin strip of Chrome which sits under the brake light and fold tape back so you can pull on it when cover has been fitted.4. Peel back all other 3M tape and apply Chrome cover to brake light cover -make sure it is central and apply the rear first! Then press down as hard as you can along the whole of the cover.5. Grab the previously folded back tape and pull away from the 3M tape, press the thin strip of Chrome where you want it to sit. NOTE:- there is embosed raised letters along the lens of the brake light - ensure this thin strip runs below this writing.Polish off your hand marks and step back and admire ...... hopefully it will look great! Good luck, but take your time over this item!
Helpful Report
Posted 11 years ago
This looks really great when fitted, at least in my opinion. As others mentioned this is a single chance to fit it correctly and like others I had some dry runs at it with the tapes still in place. My method was to only expose about 10mm each end of the adhesive tape on the thin edge that runs under the light lens, I put some masking tape on each end of the plastic tape that you pull off, I figured the thin plastic part of the cover was flexible enough to pull the rest of the tape off once the main body was in place. I then exposed the adhesive on the main body of the cover, and positioned the cover and then pressed down to fix in place, once this was fixed I positioned the thin chrome strip where I wanted it to be on the lens, gently pulled it away enough to create a gap that allowed me to pull the tape off and expose the adhesive, with only the thin piece to guide it was easy to now stick this down in the correct position on the lens. Hope that helps someone that may be put off due to the risk of the part not sitting correctly.
Helpful Report
Posted 11 years ago